Wouldn’t it be nice to know how many people actually visited your blog each day? How about knowing which of your posts are the most popular? Well surprisingly Blogger doesn’t currently offer any native blog analytics but fortunately there is Google Analytics — available for free.
Google Analytics is a great tool that will show you all sorts of useful information about how people found your blog, keywords they searched on to find you, where they came from and even how long they stayed. You’ll learn more about where your visitors come from and how they interact with your blog. This is a must tool if you are trying to build a profitable blog otherwise you are flying blind!
This article will show you how to add Google Analytics to your Blogger blog. It’s a fairly simple process and doesn’t require any technical skill at all.
Step #1 – Setup a Google Analytics Account
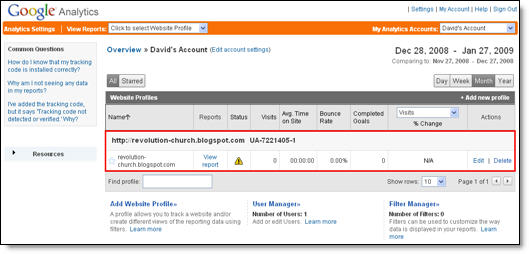
Go to Google Analytics and sign in using your Blogger login. If your account doesn’t work for some reason, you can create a new one instead. Once you login you’ll see a screen that looks like this:
Step #2 – Adding GA Tracking Code to Your Blogger Template
This is not a very difficult step even if you are afraid to touch your template code. Login to your Blogger account and then click on the “Layout” => “Edit HTML” tabs. This will bring you to the template code. Before you make any changes, I advice you to back up your template just in case there are any problems. After you’ve done so, continue reading.Now in the edit template html code window, scroll all the way to the bottom of your template code and look for the
Ok, now go back to the code you saved before in a Word Doc from Google Analytics. You are going to copy it and paste it right above the

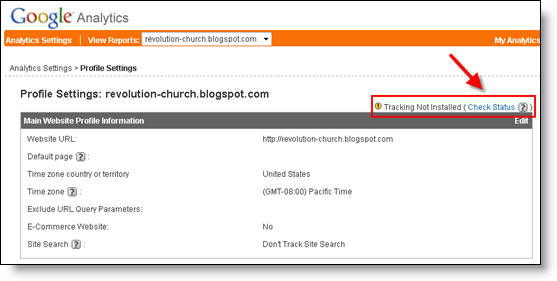
Step #3 – Confirm Google Analytics is Tracking
Go back into your Google Analytics account and look at your dashboard. Most likely you will see a little yellow exclamation mark under the “status” column that looks like this: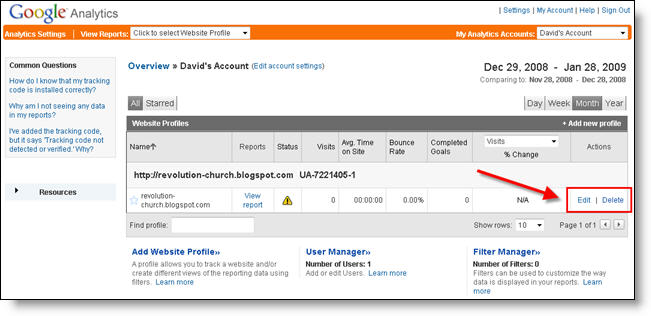

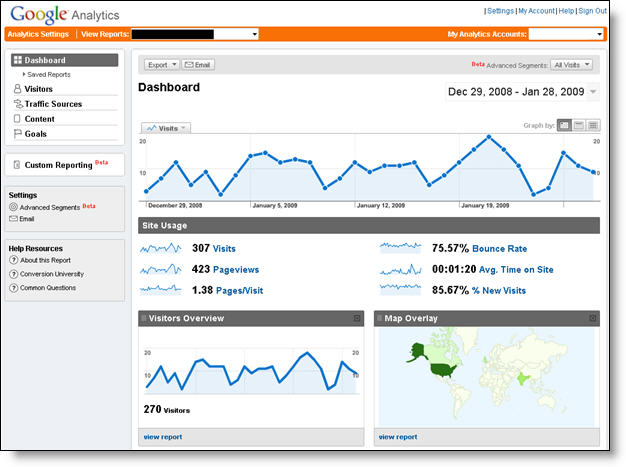
Now it usually takes an hour or so before you will see any data (maybe longer if you don’t get much traffic to your blog) so please be patient. Trust me, you’ll be logging in at least once a day just to see how much traffic your blog is getting. It’s very addicting and powerful information to learn from. You’ll be surprised which posts are your most popular and what countries people are coming from to read your blog.
Google Analytics is very powerful and we have just learned how to install it into your Blogger template. We haven’t even scratched the surface on the features and reporting it can do. For most Bloggers, this will be enough. Data will be collected and you will just review it. Others with more in-depth goals (like selling products or services, creating a sales funnel, etc) will want to spend more time learning GA. Hope you enjoyed the tutorial and don’t blame me for your new found addiction!
Ready to super charge your blog? Check out our professional premium blogger templates or make money by joining our blog affiliate program!
If you like this post then please consider subscribing to our eBlog Templates RSS feed. You can also subscribe by email and have new templates and articles sent directly to your inbox.
--------------------------------------------------------------------------------------------------------------
Có tuyệt vời hay không nếu bạn biết được có bao nhiêu người xem Blog của bạn mỗi ngày? Bài viết nào của bạn được mọi người quan tâm nhất? Thật ngạc nhiên là hiện nay không có bất kỳ blog nào hỗ trợ tính năng này , nhưng may mắn thay, với Google Analytics — một dịch vụ hoàn toàn miễn phí đã đáp ứng được nhu cầu này của bạn.
Google Analytics là một công cụ tuyệt vời có các tính năng hữu ích giúp bạn có các thông tin quan trọng như có bao nhiêu người tìm kiếm blog của bạn, từ khóa mà họ tìm kiếm tới blog của bạn, họ tới từ đâu và thậm chí cả khoảng thời gian họ lưu lại blog của bạn. Bạn sẽ hiểu rõ hơn họ từ đâu tới và họ tương tác ra sao với blog của bạn. Đây là công cụ cần thiết phải xây dựng nếu không bạn sẽ thành một người không có định hướng cho blog của mình (Người mù bay).Trong bài viết này tôi sẽ hướng dẫn các bạn cách đăng ký và cài đặt Google Analytics cho Blogger blog. Rất đơn giản để thực hiện và không yêu cầu bất kỳ yêu cầu mạng tính ký thuật nào.
Bước #1 – Đăng ký tài khoản Google Analytics
Vào Google Analytics để đăng nhập, nếu chưa có tài khoản thì bạn hãy tạo ngay cho mình 1 tài khoản Màn hình Đăng ký như hình dưới:
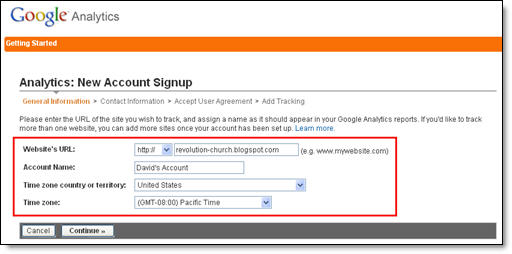
Click vào nút “Sign Up >>” để tới các bước tiếp theo. Điền đầy đủ các thông tin về Website URL, Account Name, Country, and Time Zone. Màn hinh hiển thị như dưới:
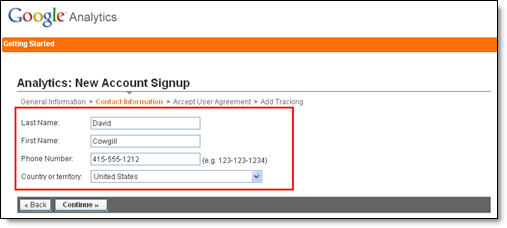
Bạn chú ý sẽ thấy, chỉ cần điefn địa chỉ Blogger url (không cần điền http://) và tên gọi của Blog ví dụ “David’s Account” bởi vì với hàng trăm các sites khác nhau trong top-level thì tốt hơn là bạn đặt một cái tên chung đối với blog của bạn cho dễ nhớ. Bước tiếp theo bạn điền các thông tin liên hệ như hình dưới
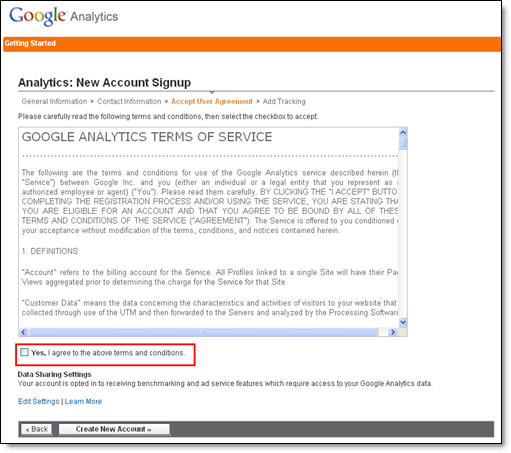
Bước cuối cùng là bạn chấp nhận Điều khoản dịch vụ, thông thường với bất kỳ dịch vụ nào đều có các điều khoản này.
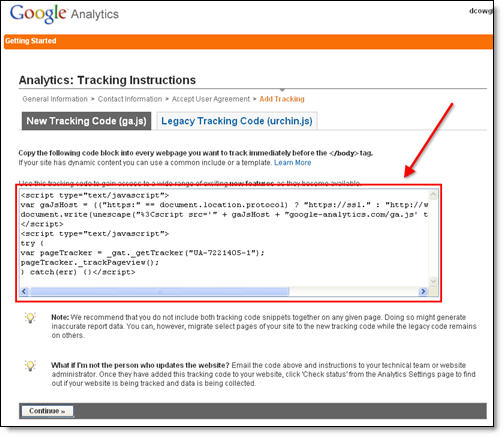
Bây giờ đến bước quan trong nhất, đây là code mà bạn nhất thiết phải copy và dán vào mẫu blogger. Code này bạn dán vào phía trước tag </body> (sẽ hướng dẫn ở phần sau).
Sau khi bạn click vào nút “continue >>” để vào màn hình Bảng điều khiển Google Analytics! Bạn sẽ thấy danh sách blog nhưng chưa có dữ liệu phân tích.
Như vậy bạn thực hiện xong việc đăng ký tài khoản Google Analytics. Bước tiếp theo là đặt code tracking theo dõi blog vào mẫu Blog của bạn để nhận được các bản báo cáo của Google Analytics cùng một số cá dịch vụ khác.
Bước #2 – Đặt GA Tracking Code vào mẫu Blog của bạn
Bước này không khó nhưng rất quan trọng, đầu tiên bạn đăng nhập vào tài khoản Blogger của bạn và click vào “Layout” => “Edit HTML” tabs. Nên nhớ, trước khi thực hiện thay đổi mẫu bạn hãy lưu lại một bản để dư phòng
Bây giờ bạn chỉnh sửa mẫu trong cửa sổ “edit template html code”, Tìm tới tag
</body> . Tag này chỉ có 1 duy nhất trong mẫu.Bây giờ bạn dán code tracking vào trước tag
</body> giống như phần đánh dấu màu vàng trong hình dướiSave lại, như vậy bạn đã chèn mã theo dõi của GA cho Blog của bạn rồi!
Bước #3 – Xác nhận Google Analytics được theo dõi
Để xác nhận tài khoản Google Analytics bạn đăng nhập vào để vào bảng điều khiển. Hầu hết các bạn đều thấy hiển thị một hình tam giác màu vàng nhỏ ở dưới cột “status” giống như:
Bây giờ từ Bảng điểu khiển bạn hãy click vào “edit” (Khoanh đỏ như hình vẽ dưới)
Sau khi click vào link đó, bạn thấy xuất hiện màn hình như dưới. Bạn sẽ thấy GA thông báo “Tracking Not Installed” theo sau là link “Check Status”. Bạ click vào link đó và thông báo cho GA để tiến hành visit blog của bạn và tìm kiếm mã mới để dán vào mẫu Blog của bạn.
Khi bạn đã dán các code theo dõi trên, GA sẽ tìm kiếm code mới và bắt đầu tiem kiếm mọi thứ trong blog của bạn. Nếu vẫn gặp các rắc rối, thì bạn nên đọc lại các hướng dẫn để gỡ rối các vấn đề gặp phải.
Khi xuất hiện dòng chữ “Waiting for Data” có nghĩa là bạn đã thực hiện chính xác các yêu cầu cài đặt của GA và dữ liệu đang được and data is being tập hợp! Click vào phía trên bên trái logo Google Analytics và quay trở lại bảng điều khiển. Bạn click vào “View report” và tại đây bạn có các thông tin theo từng chủ đề
Sau đó, thường mất một giờ hoặc lâu hơn trước khi bạn sẽ nhìn thấy bất kỳ dữ liệu nào (có thể lâu hơn nếu bạn không nhận được nhiều lưu lượng truy cập vào blog của bạn) thì xin vui lòng kiên nhẫn.
Bạn sẽ được đăng nhập ít nhất một lần một ngày để xem có bao nhiêu lưu lượng truy cập blog của bạn. Bạn sẽ ngạc nhiên mà các bài viết của bạn là phổ biến nhất và những gì các quốc gia đến từ mọi người đang đọc blog của bạn.
Google Analytics là rất mạnh và chúng tôi đã chỉ cho bạn biết làm thế nào để cài đặt nó vào mẫu Blogger của bạn. Đối với hầu hết các người viết Blog, điều này sẽ có đủ. Dữ liệu sẽ được thu thập, và bạn sẽ chỉ xem xét nó. Các ngành khác với sâu hơn các mục tiêu (như bán sản phẩm hay dịch vụ,) sẽ muốn dành nhiều thời gian hơn học GA. Hy vọng hướng dẫn này sẽ có ích cho bạn .
Nguồn: www.eblogtemplates.com


0 nhận xét:
Post a Comment